CANbus Software Installation
Table of contents
![]() This is considered an advance configuration and assumes some underlying knowledge of Linux/Raspberry Pi OS and Klipper.
This is considered an advance configuration and assumes some underlying knowledge of Linux/Raspberry Pi OS and Klipper.
Special thanks to Esoterical’s CANBUS Guide and Zippy’s CANBus Your Pico.
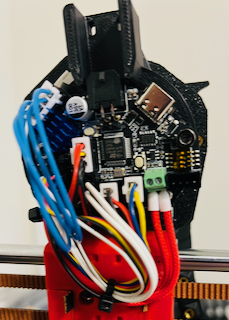
CANbus is communication protocol that only uses 2 wires. Most commonly in 3D printers it is used to connect a second MCU, often a toolhead board, to the main controller. This is exactly the use case I have set up. I am running a BTT EBB36 mounted on my toolhead. All of the toolhead electronics (hotend, thermistor, fans, LEDs, extruder motor, bed probe, etc.) are connected to that board. The board is then connected to my main MCU using 2 wires and a CAN transceiver. The board does also require 2 wires for power. So now all of my toolhead electronics and managed using only 4 wires back to my electronics case.
It is worth noting the EBB36 can be connected in USB mode and does not require the use of CANbus. Additionally, other boards are available and there are some other ways to run CANbus on a 3D printer. This covers using a BTT SKR Mini E3 V3 as a USB to CAN bridge along with a cheap CAN transceiver to communicate with the EBB36. Klipper then connects to all of these devices using CAN rather than USB.
![]() All of the CAN devices must be correctly wired and powered for this to work. See the section on electonics & wiring for inspiration.
All of the CAN devices must be correctly wired and powered for this to work. See the section on electonics & wiring for inspiration.
Build the CAN Network
For Raspberry Pi OS set up the CAN interface with:
sudo nano /etc/network/interfaces.d/can0
Then populate the file with the following block:
allow-hotplug can0
iface can0 can static
  bitrate 1000000
  up ip link set can0 txqueuelen 1024
This sets up the CAN network with a bit rate of 1,000,000 as recommended in the Klipper docs and a transmit queue length of 1024. The Klipper docs recommended 128. Other guides recommended higher. After struggling with timer too close errors, I found 1024 works well.
Once these are saved, reboot the Pi.
Flash the BTT SKR Mini E3 V3
![]() These steps are specific to the BTT SKR Mini E3 v3 mainboard. It will need to be adapted for any other device.
These steps are specific to the BTT SKR Mini E3 v3 mainboard. It will need to be adapted for any other device.
Make sure some python dependencies are installed on the Pi:
sudo apt install python3 python3-pip python3-can
Build & Flash Katapult
I elected to install Katapult on the SKR. This allows the CANbus network to be used to flash Klipper firmware. Normally, the SKR Mini E3 v3 must be flashed directly from the SD card slot. Katapult replaces the default bootloader to make this possible. However Katapult is not mandatory for CANbus. Skip ahead to building and flashing Klipper to manually flash firmware without Katapult.
![]() Overwriting the bootloader on the SKR Mini E3 V3 has the potential to brick the mainboard if done incorrectly. Proceed with caution.
Overwriting the bootloader on the SKR Mini E3 V3 has the potential to brick the mainboard if done incorrectly. Proceed with caution.
Start by cloning Katapult to the Pi.
cd ~
git clone https://github.com/Arksine/katapult
Open the configuration tool and begin to configure the firmware.
cd ~/katapult
make menuconfig
I have included a screenshot of the relevant settings. Once again, remember this is specific to the BTT SKR Mini E3 V3.
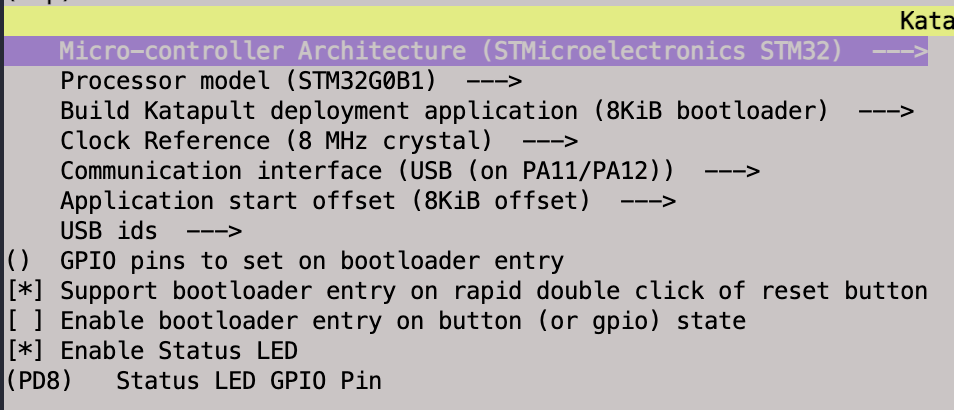
Build save the configuration and build the new firmware/bootloader.
make clean
make
The new bootloader will have been generated as deployer.bin under the path ~/katapult/out/deployer.bin.
The bootloader must be installed from the SD card slot. Copy deployer.bin to a MicroSD card that has been formatted to FAT32. Rename deployer.bin to firmware.bin.
Power off the printer mainboard, insert the firmware SD card, and power on the mainbaord. Wait several moments for the new bootloader to flash.
Assuming it was all done in accordance with the above screenshot, the status LED should start to slowly blink indicating Katapult mode.
Additionally, running ls /dev/serial/by-id should show a Katapult device connected via USB.
usb-katapult_stm36g0b1_########-####
Make note of the above device name as it will be needed to flash Klipper later.
Build & Flash Klipper
Klipper needs to be built for the SKR Mini E3 v3 to communicate via CANbus. Open the Klipper configuration tool.
cd ~/klipper
make menuconfig
Build the configuration for the BTT SKR Mini E3 v3 to communicate via USB to CAN. Make sure the bootloader offset is agrees with the Katapult install. Select a CANbus interface, PB8/PB9 are pins easily accessible on the EXP1 header. Finally make sure the bit rate is the same as the previously configured CAN network. Once again, I have attached a screenshot of my configuration for a BTT SKR Mini E3 v3 for CANbus in bridge mode with Katapult.
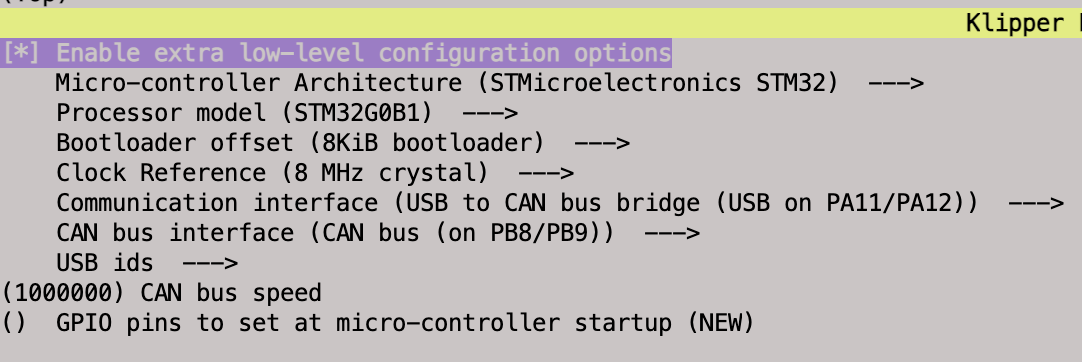
Save the configuration and generate the firmware.
make clean
make
This will generate the firmware as a klipper.bin file in under the standard path of ~/klipper/out/klipper.bin. It is now ready to be flashed with Katapult or without Katapult.
Flash without Katapult
If not using Katapult, the new firmware must be flashed via SD card. Copy klipper.bin to a MicroSD card that has been formatted to FAT32. Rename klipper.bin to firmware.bin.
Power off the printer mainboard, insert the firmware SD card, and power on the mainbaord. Wait several moments for the firmware to flash.
Flashing with Katapult
If Katapult is installed on the mainboard, the Klipper firmware can be flashed directly without the need for an SD card.
First stop the Klipper service.
sudo service klipper stop
Navigate to and run the Katapult flash script:
cd ~/katapult/scripts
python3 flashtool.py -d /dev/serial/by-id/usb-katapult_stm36g0b1_########-####
![]() Make sure to use the correct
Make sure to use the correct /dev/serial/by-id/ path for the Katapult mainboard as found when it was previously flashed.
Connect via CAN
The CAN network should now be running. Assuming the network is can0, This can be verified with:
ip -s -d link show can0
The output should show the details of the CAN network, including the bit rate and transmit queue length set previously.
The mainboard should also be visible as a CAN device with lsusb.
The CANbus query tool will discover the CANbus UUID of the mainboard.
~/klippy-env/bin/python ~/klipper/scripts/canbus_query.py can0
This UUID will be used in the printer.cfg file to tell Klipper to use CAN for communication. Remove the serial line and add the canbus_uuid as it corresponds to your machine.
[mcu]
- serial: /dev/serial/by-id/usb-Klipper_Klipper_firmware_12345-if00
+ canbus_uuid: 027a9447a345
Assuming everything went according to plan. The Mainsail interface should now be accessible without any mcu communication errors and via CANbus.
Flash the BTT EBB36 Toolhead Board
The whole reason I set this up it to use the EBB36 via CANbus. Now that board needs to be flashed with Klipper and setup as an additional MCU with CANbus communications.
![]() These steps outline how I setup my BTT EBB36 v1.2 board. They will vary between board models and versions. Adjust as needed.
These steps outline how I setup my BTT EBB36 v1.2 board. They will vary between board models and versions. Adjust as needed.
Build & Flash Katapult
The host should already have Katapult cloned from the previous steps. Now Katapult must be built and flashed to the EBB36 to allow Klipper to be flashed and updated via CAN.
cd ~/katapult
make menuconfig
Select the settings as they apply to the specific board being used make sure to use the same speed and offsets as all other devices on the CAN network. Once again, I have included a screen shot of the settings I used specific to my BTT EBB36 v1.2.
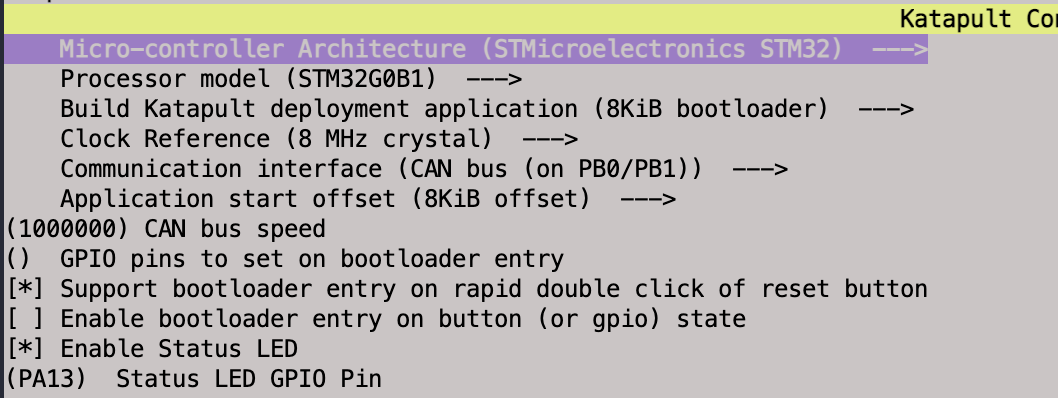
Save then build the firmware file.
make clean
make
Now the board needs to be powered and connected to the Raspberry Pi host via USB. If the board already has a 24v power source connected, then all that needs to be done is plug a USB data cable into the board and Pi.
If the board has not yet been wired to a 24v power source, it can temporary be powered via USB by placing a jumper across the VUSB pins as shown below.
![]() Do not jump these pins if the board has a 24v power supply attached as it can result in damage to the components.
Do not jump these pins if the board has a 24v power supply attached as it can result in damage to the components.
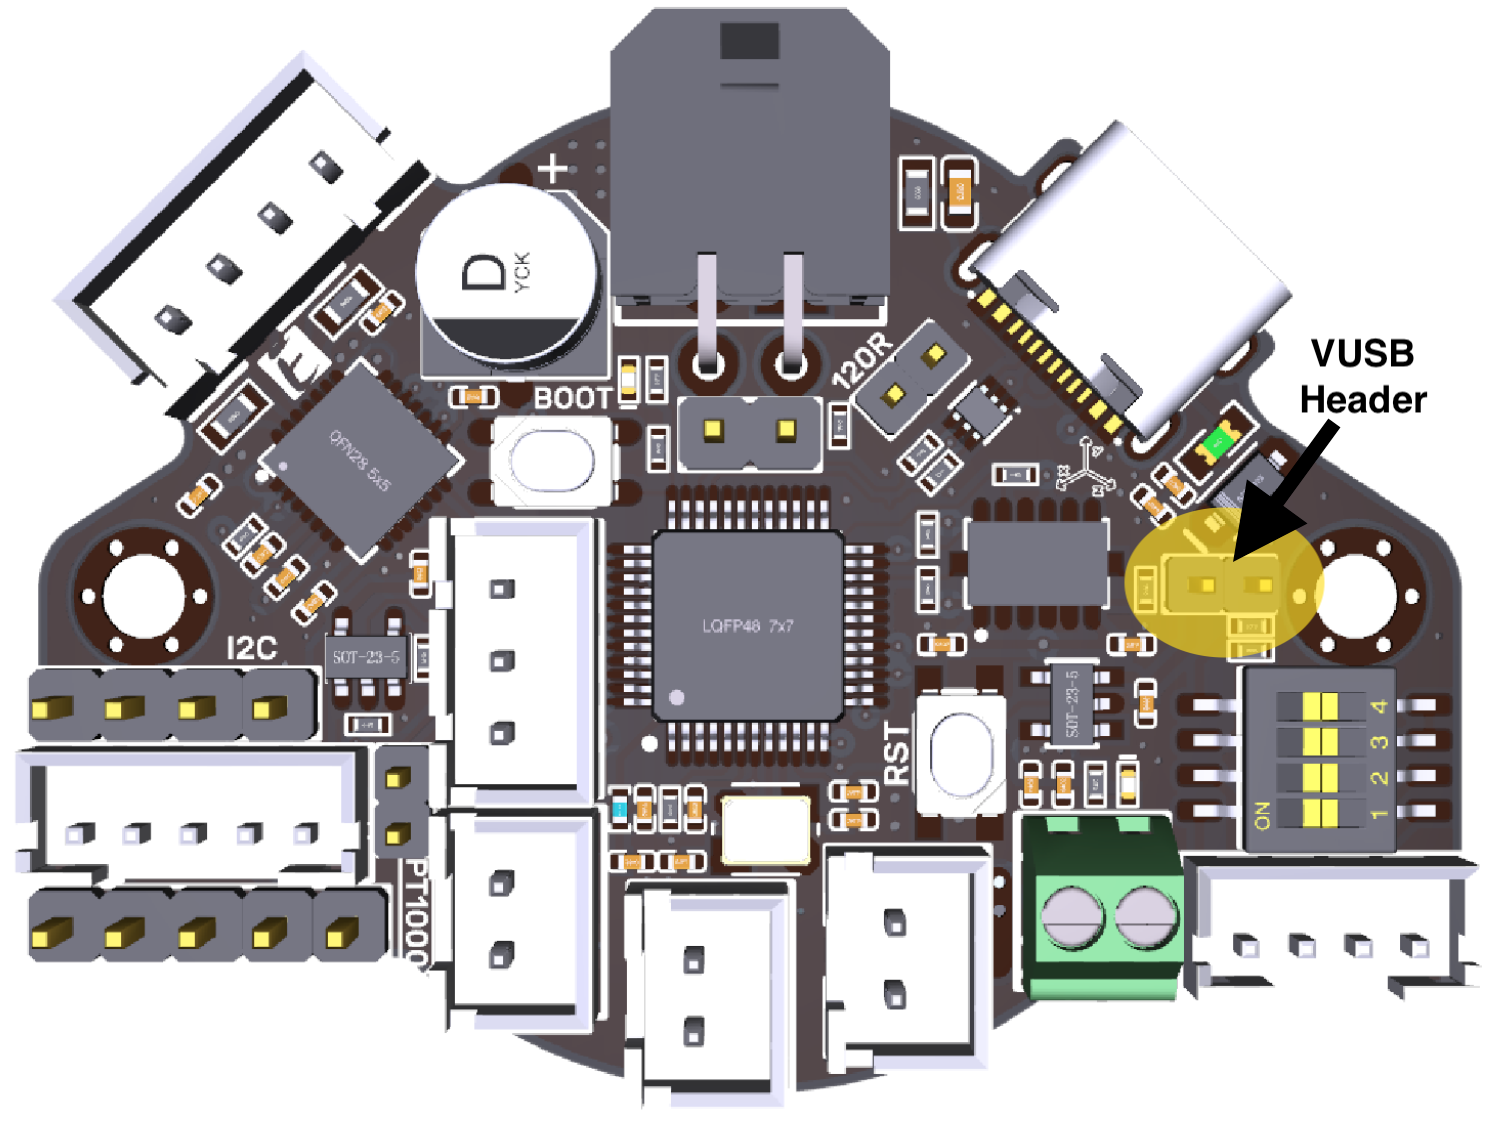
Next place the board in device firmware upgrade (DFU) mode by holding the boot button and pressing rst.
![]() Use caution when in DFU mode if a heater is connected to the board. I have heard reports of the heaters being powered while in DFU mode.
Use caution when in DFU mode if a heater is connected to the board. I have heard reports of the heaters being powered while in DFU mode.
Verify the board booted into DFU mode and is attached to to the Pi:
sudo dfu-util -l
Make sure to grab the device ID (####:df##) and internal flash address (0x0#####). Use these values to flash Katapult onto the EBB36.
sudo dfu-util -R -a 0 -s 0x0####:force:mass-erase:leave -D ~/katapult/out/katapult.bin -d ####:df##
After the process is complete File downloaded successfully should display along with dfu-util: Error during download get_status. Ignore the error then shutdown the Pi and printer.
Remove the USB cable and any jumpers needed for the flashing. Make sure the EBB has 24v power and is connected via CAN. Power everything back on.
If the Status LED GPIO Pin was enabled and set correctly, the EBB LED shoudl be blinking about once per second to indicate it has booted into Katapult.
In order to find the UUID and verify the board is on the CAN network and in Katapult mode, run:
python3 ~/katapult/scripts/flashtool.py -i can0 -q
Record the UUID and make sure it is showing Application: Katapult.
Build and Flash Klipper
Build the Klipper firmware specific to the toolhead board:
cd ~/klipper
make menuconfig
Once again pay attention to the bus speed, clock reference, and bootloader settings making sure they agree with the other CAN device settings. Adjust all settings in accordance with the specific toolhead board. A screen shot of my EBB36 v1.2 Klipper settings is below.

With the correct settings, save and build the Klipper firmware.
make clean
make
Stop the Klipper service.
sudo service klipper stop
And Flash the new Klipper firmware file to the EBB36 via CANbus and Katapult. Make sure to use the UUID recorded after building and flashing Katapult on the EBB.
python3 ~/katapult/scripts/flashtool.py -i can0 -u ####UUID### -f ~/klipper/out/klipper.bin
Confirm the flash with:
~/klippy-env/bin/python ~/klipper/scripts/canbus_query.py can0
A canbus_uuid with Application: Klipper should be the resulting output. Record this UUID for use in the printer.cfg file and restart the Klipper service.
sudo service klipper start
Add the Toolhead MCU
Add the toolhead MCU to printer.cfg with the following lines:
[mcu EBBCan]
canbus_uuid: 0e####0c
Where the canbus_uuid is the UUID previously obtained from ~/klippy-env/bin/python ~/klipper/scripts/canbus_query.py can0. The EBBCan is the name of this toolhead MCU and is the default used by BTT. It can be modified if desired.
Configuration
By now, the BTT SKR Mini E3 v3 and BTT EBB36 v1.2 should be communicating via CAN. The next section covers the configuration of Klipper and other software, including the secondary MCU and CAN references.